If you’re following along, you know that version 1.0 of my GPS clock was a total bust. I somehow managed to screw up the PCB. I had the FTDI RX and TX lines tied to the wrong port on the ATmega2560. There was just no way to rework the board. Besides, I like to keep my final projects looking neat and clean. Rework wires are just a big no-no in my book. That meant that I had to fix the error on the PCB and place another order. I got my boards and most of my parts. I soldered together what I could. So far, it looks like it’s going to work!
Read More... Oct 26, 2014 Filed in:
Misc | Electronics
I don’t know what I’ll do with it, but it’s better than just throwing it out. Maybe it’ll come in handy one day. Just remember, never throw anything away unless you’ve torn it apart first!
Read More... Oct 18, 2014 Filed in:
Arduino | Electronics | PCBs
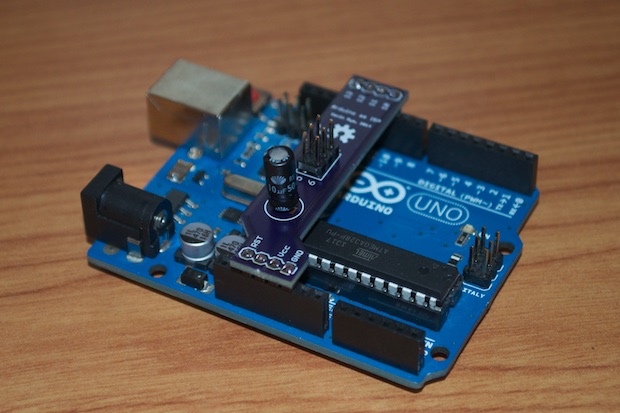
Many a time have I had to set up my Arduino UNO as an ISP in order to burn the bootloader to either another Arduino or an SMD project. It’s a pain every time having to look up the pinouts and construct a cable each time. Having a shield is so much easier than messing around with jumper wires and DIY homebrew cables.
Read More... Oct 17, 2014 Filed in:
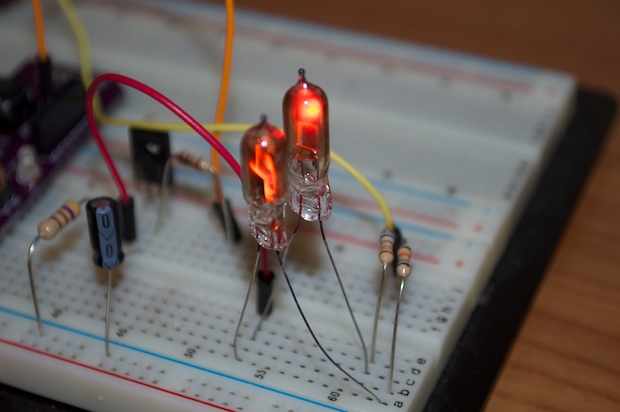
Electronics | Clocks | Nixies
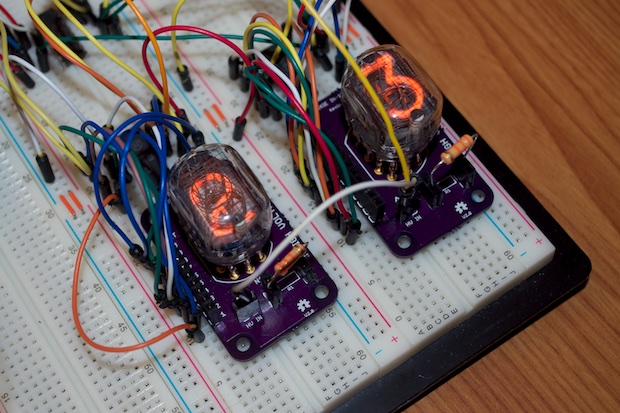
Moving right along with the nixie tube experiments... I decided to add a 74595 shift register into the mix and attempt to shift out some data to two of my nixie breakout boards through a 74141 nixie driver.
Read More... Oct 06, 2014 Filed in:
Electronics | Nixies | PCBs | Arduino
In order to drive a nixie, you can use a 74141 BCD decoder. Sure, you can use transistors, but you’ll need a bunch of them. You can drive all 10 nixie segments off one 74141 chip. All you have to do is feed it a number in binary and the chip lights up the corresponding cathode on the nixie; the same way you’d drive a 7-segment display with a 74247.
Read More... Oct 02, 2014 Filed in:
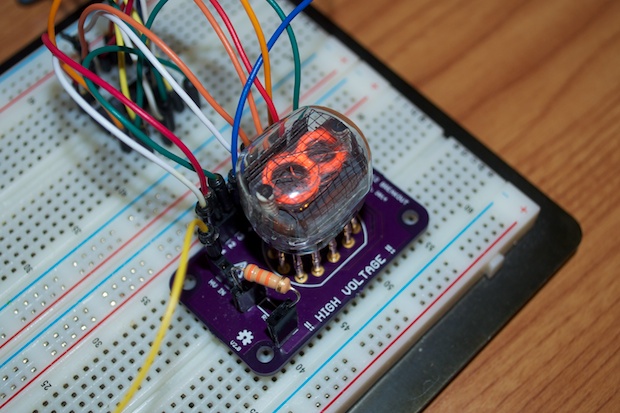
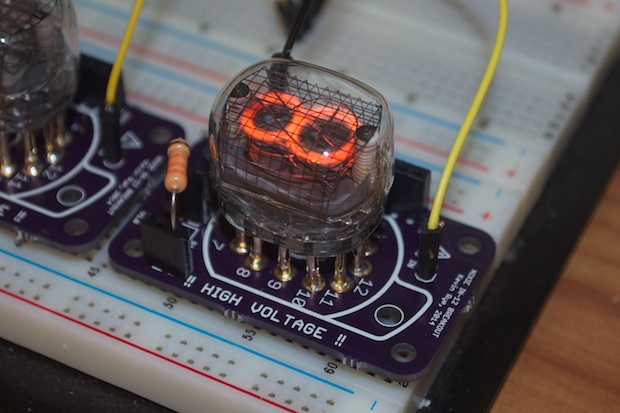
Electronics | Nixies | PCBs
Rev 1 of my IN-12 Nixie Breakout Board was an abomination. Upon realizing that the nixie footprint that I used for the PCB was completely wrong, I immediately re-spun the board. I got it right this time. All ten digits light up when the corresponding pin is grounded on the 10-pin header.
Read More...
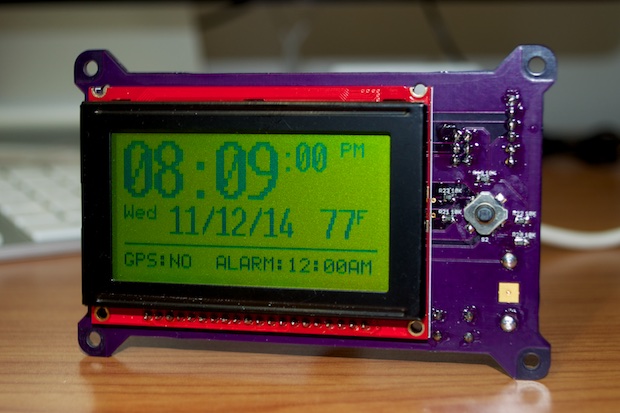
I was amazed at how fast my GPS PCBs arrived in the mail. Usually OSH Park takes a good 2 weeks to turn around a board. However, this time they arrived in 5 days. The boards look great...and they arrived just in time for the weekend!
Read More... Sep 20, 2014 Filed in:
Electronics | Arduino | Nixies
I’m in the very early stages of prototyping a nixie clock. I picked up some MJE340 power transistors to switch on some IN-3s. I can then use a digital pin on my Arduino to turn on the IN-3s through the transistor. I’ll then have myself a blinking colon for my nixie tube clock.
Read More... Sep 20, 2014 Filed in:
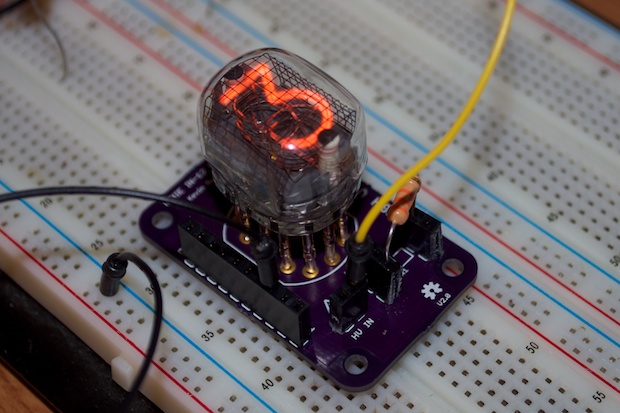
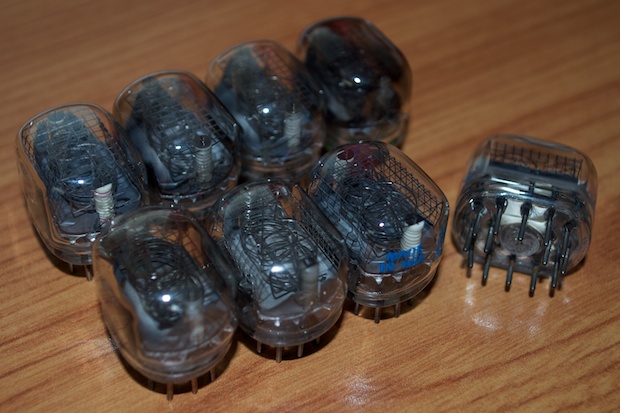
Electronics | Nixies | PCBs
After a long month of waiting for PCBs, nixie pins, nixie sockets, and resistors....I was finally able to assemble my IN-12 Nixie Breakout Boards. Too bad the pinouts are backwards and half the digits don’t work. See, this is why we prototype!
Read More... Sep 14, 2014 Filed in:
GPS | Arduino | Clocks | Electronics

Wow, has it been a long time since I worked on the GPS clock. A whole 8 months! The prototyping and PCB design was completed a long time ago. I just didn’t want to order the PCBs until the code was complete. The PCBs cost $60 bucks from OSH Park. That’s a lot of money to spend on PCBs that might not work, so I really wanted to make sure everything was solid. I just keep getting distracted with other projects. It’s time to just bite the bullet and finish it.
Read More... Sep 13, 2014 Filed in:
Tools | DIY | Electronics | Computers | Kits
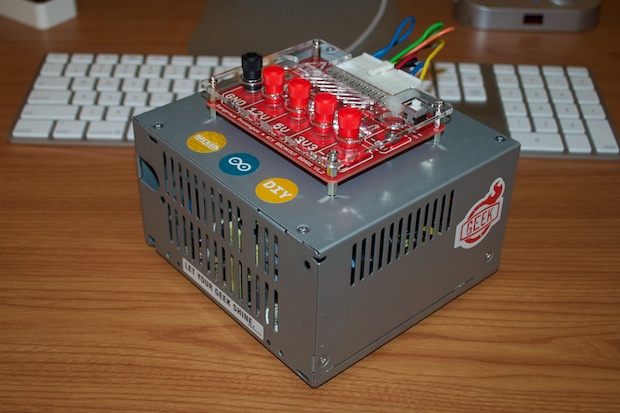
Finally! After waiting 3 weeks for my ATX Breakout Board to arrive, I got to work on my DIY bench-top power supply. I really like the way it came out. It’s going to come in especially handy with all the upcoming nixie projects I have in mind. I’m going to get a lot of use out of it.
Read More... Aug 31, 2014 Filed in:
Kilt | Scotland

My wife kicked off with the kids to her friend’s house for the weekend. While I’d love some peace and quiet to work on PCBs, 3D renders, and code, I figured I’d bugger off and do something too. While I treasure my “me time”, this is also the weekend that the Capitol District Scottish Games are held. Any excuse to wear my kilt. Gotta represent!
Read More... Aug 24, 2014 Filed in:
Tools | DIY | Electronics | Computers | Kits

My wife came home today with her friend’s 12 year old junker of a Dell. The machine is toast. The motherboard is shot. The only thing left to do was gut it for parts. The only real gem out of the lot was this 250 watt ATX power supply. I’d love to make use of Dangerous Prototypes’ ATX Breakout Board and make a bench-top power supply for prototyping.
Read More... Aug 06, 2014 Filed in:
Nixies | Electronics | Kits
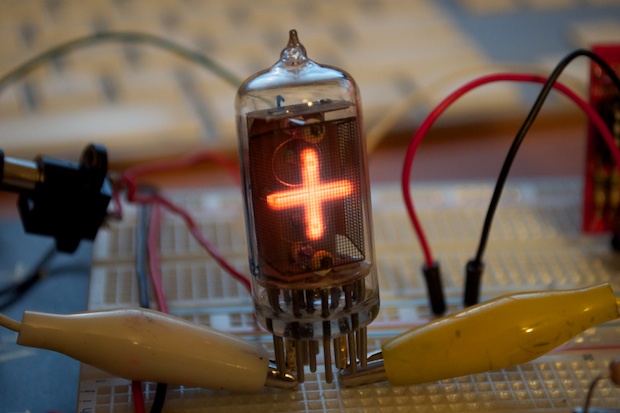
Ohhhh yeaaah!!!! It only took me a decade, but I finally got one of these nixies fired up! As I mentioned in my previous post, I picked up a new nixie power supply kit off eBay for under $10 bucks. It worked like a charm.
Read More... Aug 03, 2014 Filed in:
Electronics | Nixies | PCBs
I’ve been wanting to build a nixie clock for over 15 years, ever since I saw the TTL nixie clock my Dad build in the 70s. Being a young lad, I was very apprehensive in dealing with the high voltages required to fire nixies. I just never had the guts. Back in 2001, I figured I’d start out small and design a TTL clock using 7490s and 7-segment LEDs. The whole clock runs off 5V and there’s zero chance of being electrocuted. It’s been a long time coming, but I think it’s finally time to bite the bullet and make a nixie clock. I’ve learned so much over the past few years working with the Arduino platform, that I’ll be able to apply what I’ve learned from all my other clock projects.
Read More... Jul 23, 2014 Filed in:
Clocks | Arduino | Repairs | Upgrades | PCBs | TTL
I did it! I finally finished upgrading the clock internals and the enclosure. I think it came out amazing. I just can’t believe after all these years that this clock finally looks like something I can be proud to display. I’m really happy with the results.
Read More... Jul 09, 2014 Filed in:
Clocks | Arduino | Repairs | Upgrades | PCBs
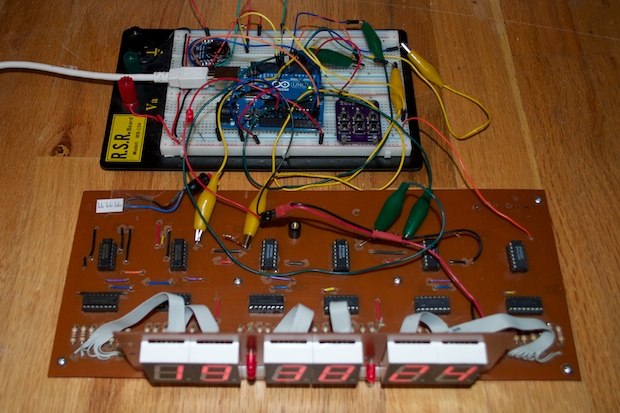
The last prototype Arduino board I made for the 7490 clock rework didn’t turn out as well as I had hoped. The board did what it was supposed to do, but the implementation wasn’t that great. The more I thought about it, the more it became clear that the Bare Bones Arduino boards I designed months ago were the perfect solution. After all, it’s projects like these that inspired me to create the Barebones Arduino in the first place.
Read More...
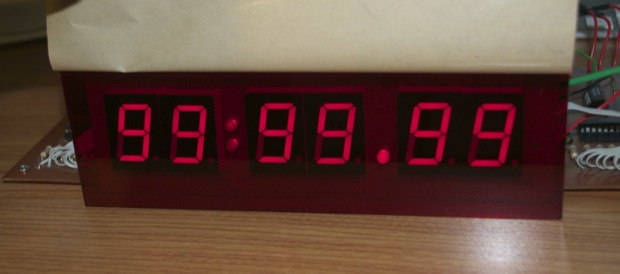
Since I wasn’t happy with the engraving on the first spin, as well as totally forgetting to make a cut out for the display, I revised my SVG file and resubmitted it to Ponoko. As far as the color, I think it’s going to look pretty good. I might lower the value of the resistors in order to brighten up the digits. I’ll have to see what it looks like when it’s all put together.
Read More... Jun 15, 2014 Filed in:
Whisky | Scotland

My wife asked me what I wanted for Father’s day. I told her she could just buy me booze. Not only did she pick me up a bottle of Black, but she picked me up a huge 1.75 liter bottle!
Read More... May 29, 2014 Filed in:
Arduino | Clocks | SMD | Laser Cutting
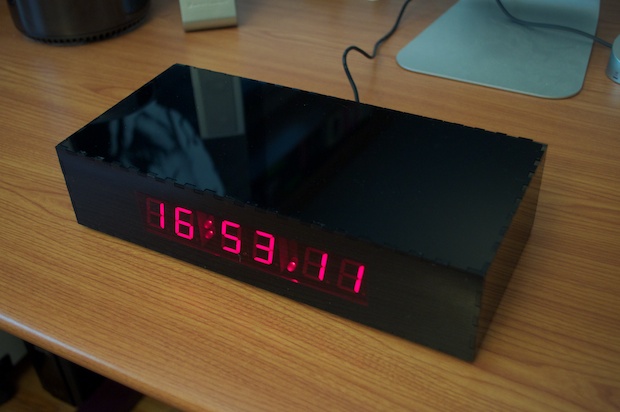
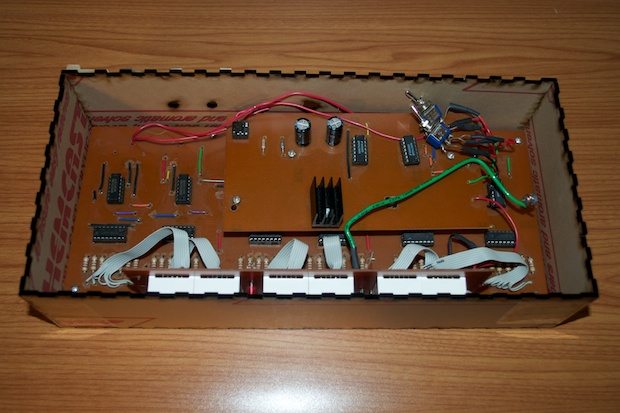
With my PCBs and the laser cut acrylic in hand, it was time to wrap this guy up. I think this clock came out so much better than version 1. I can’t think of a reason to do a version 3. With this, I think I’ve done all I can do with a 16x2 LCD clock.
Read More... May 25, 2014 Filed in:
Arduino | Clocks | SMD | Laser Cutting
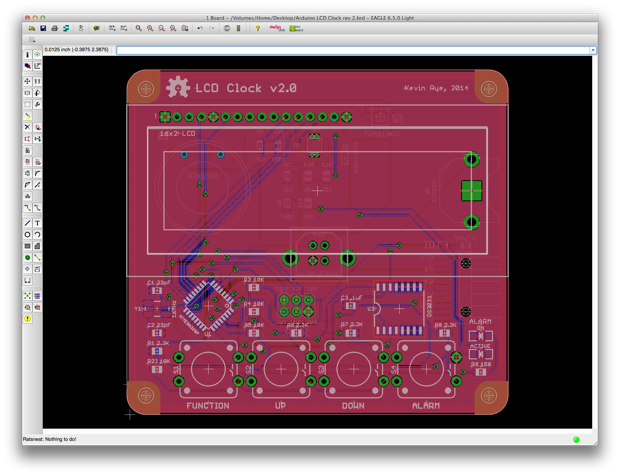
When I had shelved this clock a year ago, I had gotten pretty far with the PCB. Although I still had some design decisions to make, as well as a ton of code to write, it was pretty much complete. Now that I’ve spent some time working with SMD Atmegas, I decided to redo the PCB to make it all SMD.
Read More... May 22, 2014 Filed in:
Misc | Design | Scotland
We're going to Disney! That's right. We have a summer vacation booked for Orlando, Florida. It's going to be awesome! Between Scotland, and 3 states in the US, we're all going to converge in Florida for one huge family vacation. This calls for a commemorative t-shirt, since a family reunion of this magnitude has not been seen in years.
Read More...
While the PCBs for the new daughterboard were being fabbed, I took the time to design a new laser-cut acrylic enclosure. It needs a few tweaks, but overall it came out awesome... and the PCB fits like a glove!
Read More... Apr 26, 2014 Filed in:
Misc | Computers
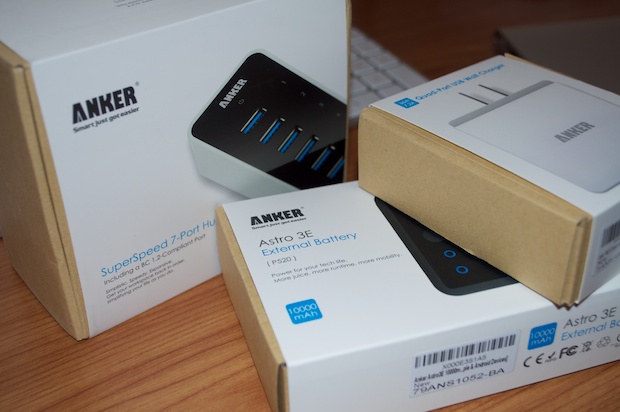
I picked up a new USB 3 hub for my Mac, but I wasn’t happy with it at all. Despite it costing $30 bucks, it was a cheap piece of junk. I sent it back to Amazon. In my search for a better model, I came across Anker. Their stuff looks awesome. Not only did I pick up their 7-port USB 3 hub, but I also picked up a 4-port USB charger and a 2-port 10000 mAh external battery.
Read More... Apr 26, 2014 Filed in:
Whisky | Scotland
Being born in Scotland, there’s just something that tells me that I should be drinking whisky. Isn’t this stuff supposed to run in or veins? Someone from Scotland who doesn’t drink whisky is like someone from Scotland who doesn’t own a kilt. (And yes, I own a kilt.) I decided it was time to acquire a taste for it.
Read More...Apr 25, 2014 Filed in:
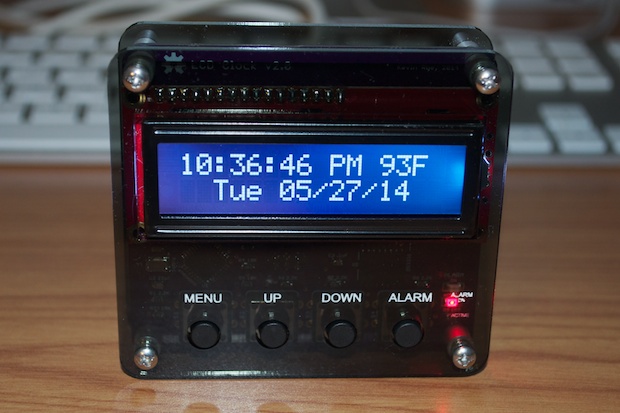
Clocks | Arduino | Repairs | Upgrades | TTL | ATtiny

Despite looking like a prototype, as well as a total piece of junk, I’m still very proud of the first clock I built in 2001. The 7490 clock was the first “big thing” that I ever designed and made from scratch. It’s a shame to leave it just sitting in the closet. After 13 years, I think it’s time to finally get it up and running the way it should, give it some upgrades, and a new enclosure.
Read More... Apr 22, 2014 Filed in:
Arduino | Kits | PCBs | Electronics | Clocks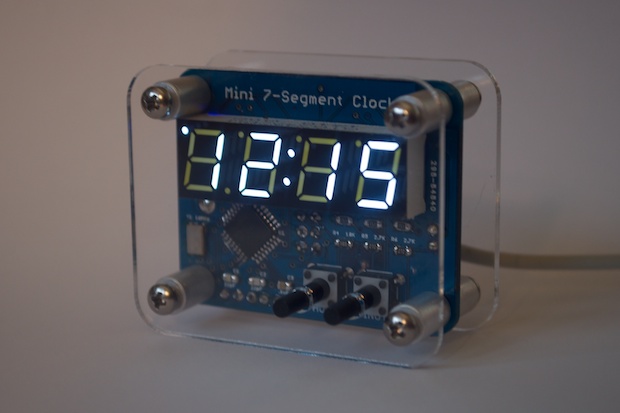
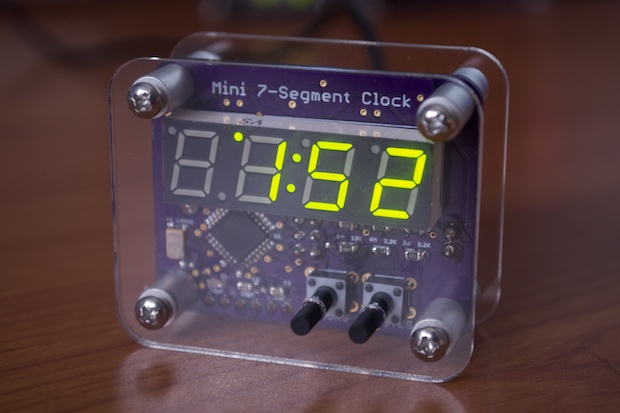
My Mini 7-Segment Clock kit is a go! All my parts have come in and it’s all ready for sale! It's a neat little kit, and a neat little clock. I warn you though, it's not for the faint-of-heart! This is no beginner-kit. It's 80% SMD, so ninja skills with a soldering iron are required. Not to mention you’ll need to burn the bootloader on the Atmega.
Read More...Apr 06, 2014 Filed in:
Clocks | Upgrades | DIY 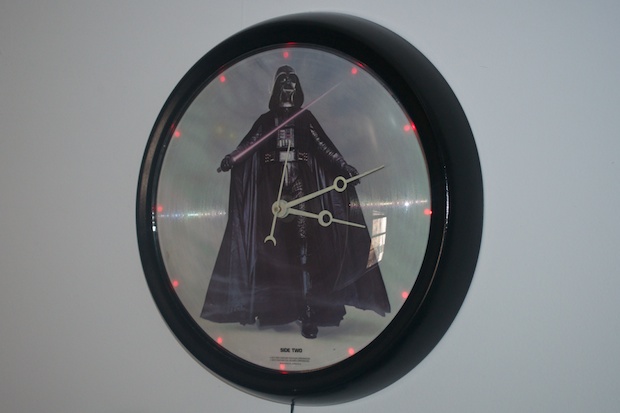
Back in 2010, I scored a clock from the maintenance guys at work. They replaced all the clocks around the building and put the old ones in the break room for people to take home. I refinished it and used a 1977 Star Wars LP as the face. I was very happy with the way that my Darth Vader clock came out. It hangs in my 7-year old son's room. However, he tells me that he has a hard time seeing what time it is without numbers on the clock. Understandable.
Read More...
Say hello to the November, 1972 edition of Playboy magazine. What’s so special about this edition? I’ll tell you.... Lena Söderberg - The First Lady of the Internet.
Read More...
Snapfish had a 99 cent print sale the other day. My wife asked me to go nuts and print a couple hundred 5-star pictures of the kids. I figured while I was at it, I’d throw in a couple of my renders just to see what they looked like printed on photo-quality glossy paper. They came out pretty damn good.
Read More...Mar 19, 2014 Filed in:
Projects | Misc | Books
My 7-year old’s class has been reading the
Flat Stanley book in school. Each kid in the class had to color and cut out a Flat Stanley character and send him to a relative who lives out of town. My brother lives 3,000 miles away in California, so he seemed like the obvious choice for who Flat Stanley should visit. The pictures he emailed back were so great that I decided to make my son a book in iPhoto that he could show off to the class. It would also be a nice keepsake for him, as well as a nice present and thank you for his Uncle.
Read More...Feb 21, 2014 Filed in:
Restoration | Misc | Books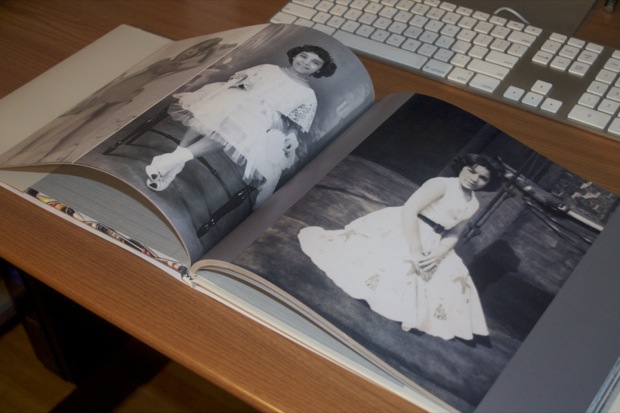
Seven months ago, I started a photo restoration project commissioned by my mother-in-law. Part 1 of the project consisted of scanning in and digitally restoring 166 vintage photos. The photos varied in size from 2x3s to 8x10s. Part 2 of the project was to then create a book in iPhoto to showcase them all. My mother-in-law was so impressed with the collection of books that I’ve made over the years for my wife, that she wanted one to.
Read More...Feb 10, 2014 Filed in:
Electronics | ATtiny | Arduino
Definitely not my best work, but it’ll do. I just wanted to use up that last PCB left over from the Tesseract build. I guess it was better to use the PCB for something rather than have it sitting in a parts drawer.
Read More...Feb 08, 2014 Filed in:
Electronics | Arduino | PCBs | Clocks
I love that feeling you get when you spend weeks working on a project, it all comes together in the end and it just works. I’m really happy with the way that version 2 came out.
Read More...
I received the PCBs for the Temperature Shield a week or two ago, but I had to hold off on putting them together. I had a few other things to wrap up first. I also needed to order some more DS18B20 temperature sensors. I finally have all my parts now as well as a little free time, so it’s time to put this one together.
Read More...
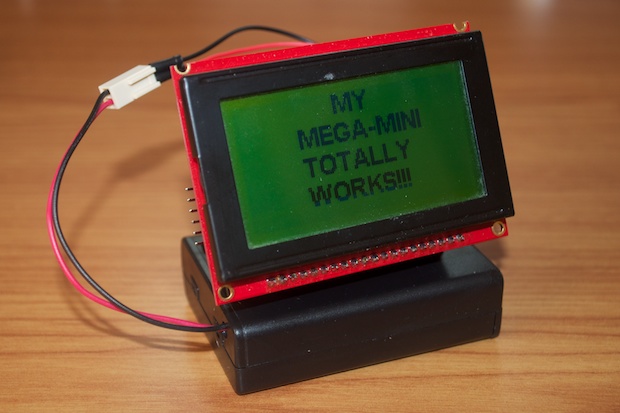
I left off with my MEGA MINI boards not working. I was banging my head against the wall trying to figure out what went wrong. I figured I’d shelf it for a week and look at it again another day with a clear head. I posted my schematic on the Arduino forums and asked if someone could lend a second set of eyes and let me know if it made a stupid design error. It turned out I had .1uF caps on the crystal! Can you believe it?
Read More... Jan 23, 2014 Filed in:
Electronics | Arduino | PCBs | Clocks

My Mini 7-Segment Clock has to be one of my favorite projects to-date. I really like the way that it came out. It's so tiny!
I’ve had a lot of people ask me if I plan on selling a kit for it. I even received an email from a reader who sent off to have some boards fabbed. He put one together himself and reported that it worked out great. When someone else builds one of your designs, it's a nice little pat on the back.
Read More... Jan 22, 2014 Filed in:
PCBs | Electronics
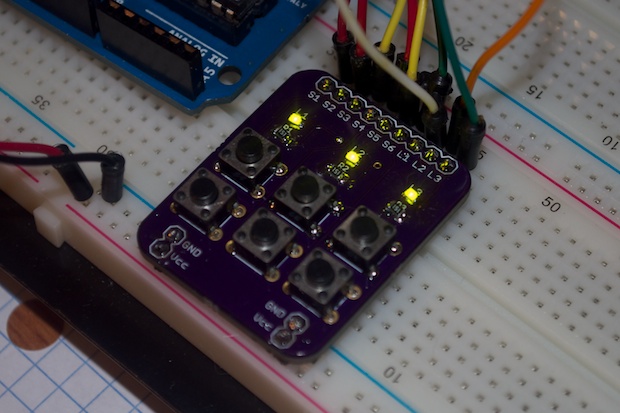
I was pretty chuffed with myself for coming up with the idea for my mini Button Breakout Board. I was pretty happy with how it came out. It’s only been a few months and already it has come in handy a few times. It’s just that it could be a little better. Everything can always be better!
Read More... Jan 17, 2014 Filed in:
Electronics | ATtiny | Arduino
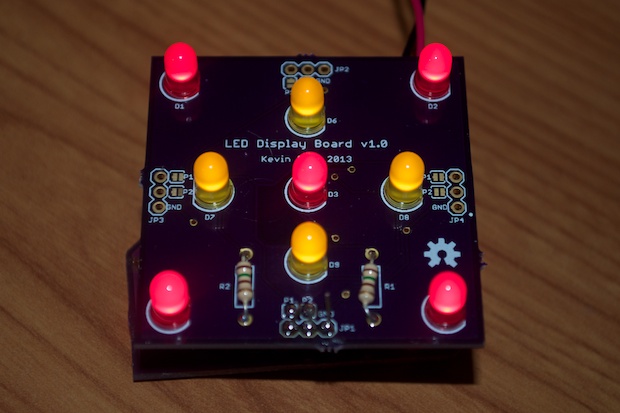
I really liked the way that the Tesseract came out. It was supposed to be the Night Light 2.0, but after some research it became apparent that blue LEDs mess with your sleep patterns. Blue LEDs aren’t exactly the ideal thing for a kid’s night light. I decided to use the leftover LED Display Board from the Tesseract for the new Night Light.
Read More...
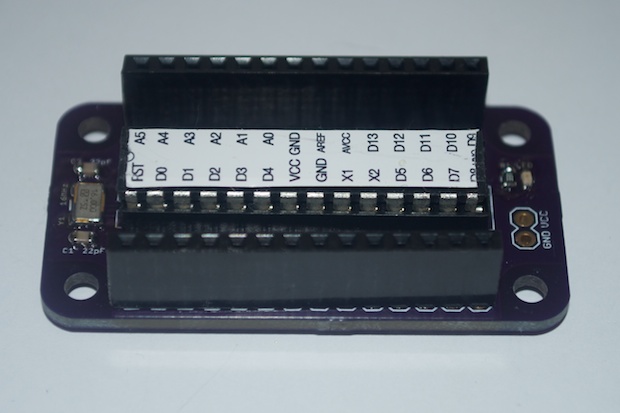
It’s only been 12 days and already I have my PCBs in-hand. This was such an easy build, and they work great. Now I just have to wait for my Temperature Shield to come in and I can complete my first project with one of these.
Read More... Jan 14, 2014 Filed in:
Electronics | Misc | ATtiny | ATmega | Tools
I had some Christmas cash that was burning a hole in my pocket. I decided to hop on SparkFun and see if there were any goodies to be had. I already needed a few things for some upcoming projects, so I figured I'd try and see if I could get my order up to $60 bucks so that I'd qualify for free shipping.
Read More...

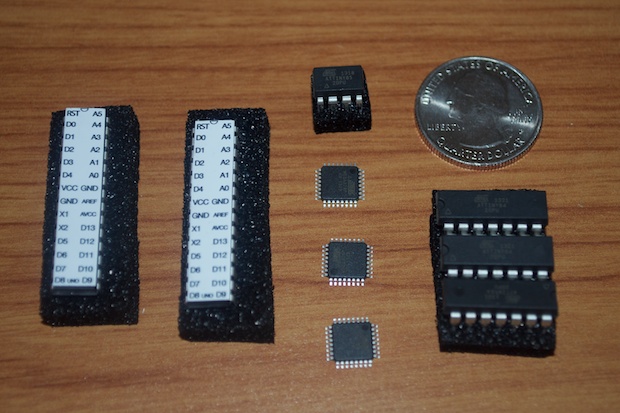
After a 2-week wait, my MEGA MINI PCBs arrived in the mail. They turned out pretty cool. I assembled two of them and installed Atmega Studio on my PC. Unfortunately, I can’t seem to write the bootloader to them. I was able to read one of the chips, but after a quick lunch break, it stopped working. I hope I didn’t kill $36 bucks worth of Atmega2560s!
Read More...
With version 3 of my Bare Bones Arduino board off being fabbed, as well as the laser-cut acrylic, it was time to go ahead a design my first shield.
Read More... Jan 02, 2014 Filed in:
Arduino | Electronics | PCBs
I really liked the way that my Bare Bones Arduino boards came out. Both versions. They’ve really come in handy. They’re great for throwing quick projects together. However, I’d like to make a new version with holes so that they can be mounted between some sheets of acrylic. I’d also like to swap out all the through-hole components for SMD versions.
Read More... 
